RAW Food for Truth Living foods lifestyle. Nutritious, raw, vegan recipes. Meals & tips for natural healing. Allergen-free, organic dishes. Courses you can prepare in no time. Meal-planning for those "on a budget". Discovering wild edibles. Eco-friendly, conscious, healthy living. . . . at home, in the office, and on the road.
Showing posts with label inexpensive. Show all posts

One Minute Green Soup That I Wish I Had on Tap!

Tuesday, January 6, 2015


I had the last few Persian cucumbers of the season sitting in the fridge. The crispy little things sure will be missed till they show up  at the market again because I can't get enough of this soup I use them for ALL THE TIME. So, that's what I made with them, yet again : )

I eat it at home or I take it with me in a mason jar...great travel food you can sip while long-distance-driving too....just make sure you have a straw! You get the picture...it's just perfect, easy, nourishing food, that's so tasty that it never gets boring (not to me, anyway).

And, yes, I do vary it a little bit, but most of the time I stick with this exact recipe:


Creamy Cucumber Soup 
(makes ~ enough to fill a quart size mason jar)
3 Persian cucumbers
generous handful of cilantro (leaves and stems, entire length)
small jalapeƱo (or other hot pepper)
2-3 tbsp hemp seeds
1 fat clove of garlic
generous splash of olive oil
pinch or oregano leaves
optional: cayenne for extra heat
½ tsp salt
1 cup (+) water

Blend it up and go! That's it! So quick, so yummy, so green, so nourishing, satisfying and hydrating. What else would you need?

Variations:

Summer time: use fresh basil instead of cilantro.
Calcium boost: use tahini instead of hemp seeds and dill instead of cilantro for another, very yummy, flavor combination and high amounts of calcium and copper.

No matter which of these alternatives you go with, it's a bone-nourishing soup and rather cleansing so it's a great "to-go" food when doing a detox (which is what I am doing with a group of other health-enthusiasts :) yay!). So go and make some! Your bones and skin will thank you...and once you taste it, you might even thank me for the recipe! :)

Enjoy!


To-Be-Devoured Persimmon Pie For The Holidays

Wednesday, October 29, 2014


One of my dear clients who quickly became a wonderful friend too invited me to a Diwali dinner and when I asked her to please tell me what to bring, she said: "a yummy, raw dessert".

Shouldn't be a hard task for someone who eats stuff like that every day, right? Um, not quite! My palate is so different...not like the average person's, to say the least. So every time I get asked to make something for a party or some kind of get together where there will be a variety of non-raw-foodie people present, I get nervous. It's not as simple as writing recipes for a blog and pointing out what is optional what is not and what ranges of the amounts of ingredients you may add to this or that...no, you make it once and that's it. You take what you've made and the guests will either like it or they won't. End of the story. Whew. And it's not that I really care about whether people like my food or not..they can always have something else...but in THIS case...well, this was a different story! Diwali is a beautiful and very important holiday and I felt truly honored to be invited and treated as part of the family and I wanted to make something that they would like. So, it was quite nerve-wracking process! : )

Whenever I'm preparing something for a new crowd I taste test my mixtures and once I find the perfect (to my palate) balance I add more sugar or salt or spices, depending on what kind of dish it is. In this case, obviously, since it's a dessert, I added some sugar. That is optional though if you've been on raw foods for a while and enjoy things closer to their original state.


So, what did I make? Well, the title already has given it away...
I'm not a pie person. Mainly because I don't have a family to feed (yet) so what will I do with a pie? Eat it all? Probably! That's what would happen but (1) I don't want to do that to myself and (2) I'm just not motivated enough to make a pie for me only.


And so, I had to come up with a recipe from scratch because I'd never made persimmon pie before...and I must have done pretty well since it was devoured within minutes, with not a crumb of it left! Ha! Never seen a crowd like a raw dessert so much! And, that's why I'm sharing the recipe with all of you...


Raw Persimmon Pie
Ingredients:
(Makes One 9-inch (23 cm) Pie)

For The Crust
1 ½ cups cashews (use a bit less if you're like me and prefer a thinner crust)*
½ cup dry shredded coconut
8 dried cherries**
4-5 Medjool dates**
1 vanilla bean (only the scrapings of it)
pinch of salt

3 T coconut oil

* any kind of (or the mixture of) buttery nuts may be used: macadamia, walnuts, pecans work well
**any dried fruit you like may be used (I like adding some for tartness, like cherries) but you may use only sweet ones and add a squeeze of lemon or even some lemon zest for a nice twist


For The Filling
9 ripe (soft and dark orange!!) Hachiya persimmons
1 T coconut oil
3 T coconut sugar (optional, taste test the filling for sweetness)
½ tsp psyllium husk powder
½ tsp (or a bit less) allspice
½ tsp cinnamon
¼ tsp ginger powder

Preparations:
1. Grind all crust ingredients, except for the coconut oil, in the food processor to make a homogenous mixture
2. In a glass bowl, work the coconut oil into your crumbly mixture by hand. Make sure the oil is well distributed and there are no chunks of it anywhere in the dough.
3. Press the dough into a pie shell (you may even use a shallow bowl instead) and pinch the edges. Place it in the fridge for 15 minutes to let the crust become firm.
4. To make the filling, the easiest thing to do is to squeeze the soft insides of persimmons into the a blender by cracking the skin open while holding the fruit above the carafe and let the soft part drop in there. Don't use any of the skin or the stems and leaves, of course, only the soft part of the fruits.
5. Add the rest of the ingredients except for maybe all the sugar and blend them into a smooth pudding-like consistency.
6. Taste test your filling mixture and add sugar (or anything else) as desired to adjust the flavor to your and you guests' liking.
7. Pour the filling into the pie crust you have chilled and either spread it with a spatula or make a pattern on top or decorate it later with berries, dried fruits, edible flowers, nuts, coconut flakes, or anything you have on hand and you think would go well and / or look pretty.

I had no berries at home and that's what I would have put on...so, I just made a swirl, which people also commented on and really liked :) simple things can really work well.

8. Place the pie in the fridge to cool and set for at least an hour before serving. You want to make sure it becomes firm enough so that the slices don't collapse and look like sauce upon cutting the pie.


Persimmon Nutrition
Besides the fact that persimmons are so delicious, you may want to take advantage of their ease of use now that they're in season because they're very nutritious too! Read all about their health benefits and another recipe made with them here.


Happy first week of the Holiday Season!...

More to come soon... : )

P.S: What does the Holiday Season come with for many of us? Parties, dinners, abundance of food, temptation to overeat and, yes, actual overeating and being less active...which, more often than not, leads to weight gain.

How would you like to do yourself a favor and help "reset" your body and mind before you're invited to those parties, social events and huge dinners?
You're in luck! Very soon you'll have a chance to sign up and join a group of like-minded people for a Pre-Holiday Body & Mind Reset - Detox Program!..

Stay tuned for the details on that!


Dita

Featured in Funky Raw, UK's raw food magazine


Childhood Favorite Reinvented….Pasta Time!

Tuesday, May 20, 2014


Yay, it's zucchini season! And what can you use this summer squash for? Well, it would be probably easier to make a list of what you couldn't do with it…because it's such a versatile vegetable. You can use it in soups, salads, dressings, crackers, breads, dips, and…..what else?…PASTA! Yes, you can make pasta dishes even if you eat raw. In the past I've shared with you my LasagnaThai PadPesto pasta recipes and here's something else that's very special to me.


This one is a childhood favorite that I wasn't planning on giving up when I switched to raw foods….a simple recipe for some soul food that might sound a bit unusual to many. As a child, I watched fresh, home-made pasta being prepared. I was always lurking around the kitchen and thought it was exciting to witness flour, eggs, and water turn into dough and then the thinnest, finest, strips of pasta that was to be covered with poppy seeds and sugar or other favorite toppings. Today's version is the kind I eat lately. The pasta preparation has nothing to do with the traditional method I just described, and the refined sugar is replaced with healthier alternatives. The key ingredient though, poppy seeds, which is one of my very favorite foods in the world, is the same, of course :)


Raw Poppy Seedish Pasta
(Ingredients for 2 servings)
2-3 medium size zucchini squashes
3/4 cup ground poppy seeds
coconut sugar/honey/maple syrup/agave syrup/preferred sweetener* to taste


*A combination of dry (crystals or powder) and liquid sweeteners works the best


Here's what you do:

1. Cut the ends of the zucchinis off and and peel them.
2. Using a machine (if you have one) or a knife, make pasta out of them as described here.
3. Toss the pasta with a generous amount of poppy seeds and a combination of dry and liquid sweeteners.
4. Share with someone you love and devour!
Ahh…heavenly.

Thank the Universe for providing such amazing foods! : )

Notes on nutrition: poppy seeds are extremely rich in minerals. Look at the amounts of manganese calcium, magnesium, phosphorous, copper, iron, etc. in them! Good for your bones, brain, skin, and hair…these tiny seeds are not only delicious but a nutritional powerhouse!


Avocado-Seaweed Salad…"Arame Style"

Wednesday, April 30, 2014


Who eats enough minerals?…..I mean, I don't even know if that's possible. Anyway I'm always on the lookout for more. Truth be told, while I love miso soup (here's a recipe, if you'd like to make some) and nori rolls, and eat dulse regularly, I don't really eat any of the other seaweeds much. Even so, every now and then, I have my moments when I'm inspired to reach for a different kind and here's the result of one of those moments documented…

With fresh spring onions and crisp Persian cucumbers added….mmmm…what's there not to like!?


Arame Salad
Ingredients:
avocado
cucumber
red radishes
arame
green onions / spring onions

For the dressing
rice vinegar / umeboshi plum vinegar
sesame oil / tahini
water
black sesame seeds
chili flakes
salt, if desired


Why Eat Arame?
Seaweeds, in general, are a nutritional powerhouse. They are very rich in minerals (calcium, magnesium, iron, zinc), are the greatest sources of iodine, have incredible healing properties, and are alkalizing foods. They have cancer-fighting properties, especially when it comes to "estrogen-induced" cancers, such as breast cancer, for example…..And, as if that wasn't impressive enough, they're anti-inflammatory, anti-viral, full of antioxidants, and are a wonderful food group to make friends with if you want beautiful skin!


Arame is rich in vanadium, a trace mineral that is important for supporting the body's ability to metabolize carbohydrates and regulate blood sugar levels. Other great sources of vanadium in the raw foods kingdom are dulse, cinnamon, and cacao.


Preparation
1. Soak the arame in water for at least 10 minutes and up to half an hour (Save the soaking water for soups or to give it to your plants! It's very rich in nutrients, especially minerals.)
2. Make the dressing by mixing equal amounts of oil / tahini and vinegar and adding some water if necessary to "thin it" to achieve the desired strength. Add salt and chili flakes if you prefer and mix in some sesame seeds. Put it aside.
3. Slice the onions thinly and put them aside to "breathe".
3. In the meantime, slice / chop up the rest of your vegetables and place them in a bowl.
4. Cut the avocado in halves, remove the pit and score them lengthwise and crosswise so that you end up with little cubes, then, using a large spoon, scoop out the fruit and add it to the veggies.
5. Drain the arame and toss everything in a bowl with the dressing. Serve on plates and sprinkle with more sesame seeds.

Remineralized.


Tropical Bites Beat Donuts

Wednesday, April 16, 2014


What do you do when they ask you to bring donuts to a meeting?  Bring donuts, right?  Nope. At least, I didn't : )
I've made these instead. They're relatively quick, easy, have only a few ingredients, and everyone will love them…Not to mention the added benefit of nutrients in them.
These fiber-rich balls are high in minerals and you might even get some bromelain out of them. Bromelain, which is an enzyme found in pineapple, may help digest proteins and even have anti-inflammatory characteristics. Oh, and the nuts are rich in unsaturated fats, the kind that's good for you ;) and cashews happen to score 100 in the amino acid department, meaning that they're a very good source of and close to being a complete protein!  It's almost too much to get from a sweet snack, isn't it!?!

So, if you have a get-together to go to tomorrow, might as well pull out the following from your pantry and get to work or rather, dance in the kitchen while creating these tropical, magical bites!

Why did I choose to use pineapple? That's what I happened to have on hand and it was the main ingredient I wanted to work around. Use may whatever dried fruit you have for an alternative, maybe not tropical, but other fruity snacks. Dried cherries make a wonderful dessert too.


Tropical Bites
Ingredients:
1/2 cup almonds
1/2 cup cashews
pinch of ground vanilla
pinch of salt
10 medjool dates
1 cup dried pineapple 
3 tbsp coconut flakes

shredded coconut, or other preferred ingredient, for rolling


Preparation:
1. Grind the nuts in a food processor until they're coarsely chopped
2. Chop the pineapple chunks and the dates into small bits if they're large pieces and/or on the dry side and add to the nut "meal" along with the rest of the ingredients
3. Process the ingredients until there are no large chunks of anything remaining but don't overdo it
4. Using your palms, roll spoonfuls of the dough into balls and then roll them into shredded coconut or   something else you prefer.

Share and enjoy!

They would keep at room temperature but I predict there will be none left to store! : )

The "Pretty Complexion Citrus Blend"

Friday, January 24, 2014


As simple as it is, I must share with you the most recent thing I'm hooked on!  It is just so delicious and refreshing. I know most, if not all, followers of the 80/10/10 diet would approve too! : )

This "Vitamin C Citrus Blend Evolution" started when I realized that it was too early to try to eat tangerines a few weeks (!!!) after oral surgery.  Yep, I knew that it was not just hurting to try to chew but I was not chewing properly and a lot of the fruit was swallowed in large chunks, especially the pith. Obviously NOT ideal!
So, what's a health-conscious girl to do? I wanted to keep eating citrus but to get all the benefits too and that includes all the bioflavanoids (aka vitamin P), and calcium that's included in the white parts not only the vitamin-C-rich, juicy part. Bioflavanoids work together with vitamin C so they're best taken at the same time.
Have you ever had capillaries (tiny little red lines near the surface of your skin) showing? One way to maintain the healthy structure of those blood capillaries and support their thin walls is by consuming lots of citrus! While bioflavanoids or vitamin C are present in a myriad of foods, citrus has them both. What a great way to take in nutrients that support circulation and brighten your complexion!

….And this is such a simple method to ensure the assimilation of these nutrients. I really started with just blending up peeled citrus, which was amazingly yummy by itself, but then I started adding a thing or two because, you know, I always try to get the most out of everything….use whatever I can as a delivery system for other nutrients. Why not?! So, I'll give you the variations I've been really enjoying. If you can find tangerines (I love Satsumas, but others will work), use them, and if not, try to combine different types of oranges or even pomelos.


Pretty Complexion Citrus Blend 
(Makes 1 pint, fills a mason jar)
Basic Version
6-7 tangerines + 1-2 orange OR 4-5 oranges

Enhanced Delivery*
6-7 tangerines + 1-2 orange OR 4-5 oranges
pinch or two ground cayenne pepper

Anti-inflammatory Boost
6-7 tangerines + 1-2 orange OR 4-5 oranges
pinch or two ground cayenne pepper
small slice of ginger

Spiced Up 
6-7 tangerines + 1-2 orange OR 4-5 oranges
pinch or two ground cayenne pepper
small slice of ginger
couple of dashes of ground cinnamon

Superfood Brightness
6-7 tangerines + 1-2 orange OR 4-5 oranges
pinch or two ground cayenne pepper
small slice of ginger
couple of dashes of ground cinnamon
small handful of goji berries


*you can read about the health benefits of cayenne pepper here

Peel the tangerines by hand and leave all the white stringy parts attached. Peel the oranges using a knife and leave as much of the white part attached as you can, simply removing a thin layer with all the zest.
Leave all the seeds in as well. The point is to keep the fruits as close to whole as possible. Eating whole foods is what's always best. The pith (the white parts in citrus) contains the bioflavanoids and is the part of the fruit that is high in calcium. This helps balance any acidity and having all the fiber in there slows the absorption of sugar. You will end up with a pulpy blend for sure if you use tangerines and practically a mush if you use a lot of/only oranges with all the pith.

Blend all ingredients you chose to use and drink slowly or take it with you in a mason jar or bottle.
It travels well so it's great to take along with you to nourish your body while on the go but if you're using mainly oranges you might want to take a spoon with you. These concoctions can become very thick over time and the longer they sit, the more of the juice is absorbed by the pith so they will get even thicker. Taking a long-stemmed spoon along with you wherever your raw lifestyle takes you is a very good idea anyway and it might just come handy!

…And just watch, your skin will thank you for this!

Have a bright and juicy day!


Are You Throwing Medicine In The Trash?

Monday, December 30, 2013


Citrus is in season!..at least it is in California. If you are lucky to live in an area where you can get organic lemons from a trusted source, you are probably as happy as I am :)
But do you toss the seeds and the peel? You may be squeezing lemon juice on salads or add some to your drinks but does the peel end up in the trash? I used to throw away the non-juicy parts…not for quite a while though!..
I've always loved lemon zest. My mom used to add some to some sweet dishes and desserts so it's nothing new to me. In certain parts of Africa and other parts of the world it's also commonly used as a condiment, usually in a fermented form. The zest is used every now and then by people in western cultures but, in general, the peel is not nearly as utilized as it could be. I, personally, used to throw them away because I just never trust the ones from the store. Lately, however, I have been getting a lot of Meyer lemons from a friend and I couldn't be more grateful! I've always left the seeds in for juicing and dressings (blended ones) and now the peels are saved too! More often than not, the peel gets used in something soon after I used the juice of the lemon, and if not, I save it for later so I will have some handy when I have no lemon to peel. Why bother?


The Hidden Treasures of Lemon (and other citrus*) Peels
Being rich in vitamin C and calcium is a good start, but did you know that lemon peels have a myriad of other health benefits? By adding lemon zest to your dishes or consuming whole lemons instead of just their juice, you'll get to take advantage of their

- cancer fighting properties
- ability to dissolve bad estrogen (a lot of which we have accumulated over time in our bodies)
- anti-fungal qualities
- mood enhancing / uplifting, anti-depressant properties
- high fiber content (to support digestion and regular elimination)
- maintaining of youthful skin / anti-wrinkle qualities (hence the frequent usage in cosmetics)
- boosting of the metabolism (which supports weight loss)
- strengthening the bones (due to their high mineral and vitamin C content)
- blood pressure regulator quality (potassium content)
- cleansing effect (lemon juice and the peel are both known to assist in the cleansing of the liver)
- ability to reduce oxidative stress (elimination of free radicals, and thereby, prevention of diseases)
- amazing flavor (lemon peel is an amazing flavor balancer if not used in large quantities)

*Be aware, that lemon and lime peels are edible raw, but others, like the peel of orange, grapefruit, etc, have to be fermented / candied / cooked or prepared some other way before consumption.

Quite a list, right? If these benefits appeal to you,  I recommend that you…

Get organic lemons from a trusted source.
Wash them and either juice them whole, or peel them first (you will save some of the pith that is so rich in bioflavonoids) or carefully cut the zest part of the peel off with a sharp knife. This way, if you're not using the whole lemon then you can save the peel or zest for later to be used in other dishes.

What do I do? At first, I thought I would save the zest only. But why break them down more than necessary? Before I ever grated any I realized the ideal way would be to just save the entire peel and if I don't use them soon freeze them that way. So I cut 1-2 inch pieces and put them into jars (any container will do) and I always have some within reach.

How to eat them?
Besides the obvious (eating some peel whenever using lemons) you can:

- add a piece of peel to a smoothie (avoid using too large of a piece because it can throw off the flavor, for example, make your smoothie more bitter than you'd like)
- add zest to salads by sprinkling some on top or mixing some into your salad dressing
- add zest to desserts by mixing some into your cookie dough or adding some to a batter or cake mix, or sprinkle some on top of any sweet dish

What Else To Use Citrus Peel For?
Since I love the aroma, I also put a lot of peels on top of the heat vents, in the colder months when the heater is going, and keep replacing them. They provide a small amount of humidity as well as a wonderful smell that fills up the space. Obviously, they're a much better "air-freshener" than the chemical-based, artificial diffusers you can plug into an outlet.
They're also a great disinfectant so you can use them to clean your cutting board or sink by just rubbing them on the surface to be cleaned.

Warning: Watch out for rabbits (or other pets??) because my little guys "steal" them and run off with them! They love peels, however fresh or dried out they are, they grab them off the vents and run, like dogs with a bone. So funny! :) So if you notice that yours are missing you might know where to look for them, or who is to blame….haha. Also, make sure to use entire halves (like after squeezing a lemon) or longer / larger pieces to avoid having them fall through the slots and end up in your heat pipes!

Alright, hopefully, just in time before you start preparing a lot of New Year's party drinks and end up with tons of peels that you would toss…now you know what to do with them! : )

Have a Wonderful New Year, Everyone!  

Thai-Inspired Creamy Bowl of Deliciousness

Friday, October 25, 2013


A soup, that is.  One that you will never forget! Promise. 
I had my wisdom teeth removed (ouch) and I'm still recovering.  Needless to say, I'm on blended foods and since it's day 10, I'm really tired of eating the same stuff over and over.  So, today, I said "This is it, I'm making something different!"  Savory and buttery is what I wanted....And I could have had a gallon of this... It's simply orgasmic!


Thai-Inspired Creamy Veggie Soup
Ingredients:
(Makes about a quart to serve 1, maybe 2)
1 small red bell pepper
1/2 stalk of celery
1 slender (stalk) lemongrass
1/4 of small red onion (or use 1-2 green onions)
1/2 carrot (or a tiny one)
3 cloves of garlic
ginger to taste (I only used a piece the size of a raisin)
1 tiny hot pepper/jalapeno
2 heaping tbsp coconut butter
pinch of ground cayenne pepper
1/2 - 1 tsp (to taste) salt 
cilantro (no more than what you can tear off a bunch with three fingers)
~ 3 cups water

Optional: pinch of turmeric, honey (not vegan) or other sweetener, soy or shoyu sauce


To Prepare:
1. Warm the water on the stove top carefully, to desired temperature. (You definitely don't want to bring it to a boil if you chose to stick with eating raw)
2. In the meantime, chop all vegetables into chunks and place them in a blender with the lemongrass (pealed back and the core chopped fine; a bit of a tough task) and the spices you are using along with the coconut butter.
3. Add the water and whirl it all up, adding the cilantro only for the last few seconds of blending.
4. Taste test. Some people like it saltier, some prefer it sweeter.
5. Garnish and serve immediately.

It's savory, warming, and incredibly flavorful and satisfying. Enjoy! : )

♥♥♥

Dita


Start A Garden!....If You Haven't Yet

Sunday, May 19, 2013


My sister and I grew up with a garden. Well, kind of. We had a grandma that lived in a village where everybody grew their own food and going to the store for anything was very rare. If one didn't have something, chances were he/she could trade with or borrow from the neighbor or someone else down (or up) the street. It was a one-street village so those were pretty much the choices you got. Everyone knew everyone and you knew exactly where to go for what when you were in need.

Later, when I was 13, we moved into a house and started our own garden. We had red current (my favorite fruit) bushes, gooseberries, raspberries, strawberries, a pear tree, a quince tree, and grapes. My mom also planted vegetables every year. We had tomato plants, rows of green peas, carrots, and maybe even some greens but I can't recall....I was on a different diet back then ;)

Besides having to pull weed with my sister (I remember how much we moaned and groaned while squatting over small patches of dirt that were densely populated by a variety of weeds that were seemingly impossible to extract, even with the help of a spade. We were less-then-ethusiastic about this weekly chore and counted the minutes...) I really loved being outside, chasing butterflies, watching the ants being busy and of course harvesting fruits and veggies. This part of my life lasted till I was 19, which is when I left that house. And ever since then I've been just dreaming of having a garden and growing food that's as pure as it gets.

After a few years of growing some tomatoes, peppers and herbs in planter boxes while moving around the country it was time to go on an adventure and try to create a small garden outside last year. The tomatoes, peppers, and strawberries all did quite well but it was still not the real thing. This season, however, we're taking it to the next level and I couldn't be any more excited about it!

New Beginnings...
I spent yesterday planting tomatoes, peppers, basil, mint, and oregano in the green house and outside are the squashes, cucumbers, corn, kale, mustard greens, dill, and even purslane (for some reason they're not popping up here wild, unless they do but the deer get to them before I do).
I wouldn't call myself an expert at gardening but I've done my best researching (as always) and I'm confident that with all the love I give the babies they will do more than fine : ) While I have farmers I go to on a regular basis for produce, there's nothing like fruits and vegetables raised at home. Besides, one's food can't get any more inexpensive and eco-friendly...


What have I done so far to ensure their best "upbringing"?
1. Needless to say, they're all organic and heirloom, whenever it was possible.
2. The babies were planted in organic soil.
3. Newly purchased baby worms are working the soil as we speak.
4. The water I use to water them I let sit at least overnight or however long it's possible. This is a practice I have been following for as long as I can remember for my (argh, every once in a while I still do that) the plants indoors as well. I highly recommend that you adopted this simple "trick" for better water. Most of us are not lucky enough to have spring water or well water or any kind of clean water around and might not even be able to collect rain water (some places it just doesn't rain much). City water is full of stuff, of course and letting it sit lets the chlorine escape from it and makes the water sightly acidic....just the way the plants prefer. Just do your best.
5. They have been fed organic vegan food...yay :)
6. Finally, I've planted marigolds in the "pflanzengarten"for added color and to keep some of the bugs away.

What do I need to work on?
1. No matter how little it rains around here (I live in zone 9a), I insist on getting a rain barrel and collect whatever amount of water possible. It will be more than what buckets can hold.
2. COMPOST. I need to start a compost. Shame on me!!!!! This has been my dream for so long too and since nearly 100% of my "trash" is scrap from produce and pulp from juicing I really am ashamed that I still don't have one. What's wrong with me? Well, ok, moving into a new home and starting new jobs in a new area comes with its own hectic schedule, but still...*sigh* I'm going to get on this ASAP.
Anyone has a compost tumbler he/she doesn't want anymore??? There better not be anyone! You should be using it.

Ok. I need to get busy. Here are some more pictures of the nursery and updates will follow!
What have YOU planted this season???


When Sweet & Tangy Unite...

Tuesday, April 9, 2013


The perfect combination of sweet and tangy comes in this tiny, oval-shaped citrus fruit I love. They're so delicious but so rare. I wonder what the reason is? I sure haven't seen them at the market until a couple of weeks ago, and when I did I pretty much screamed, and probably looked like the happiest kid in Disneyland. I have a radar for treasures like this at the market. They haven't been around since, so I'm grateful to have caught them the one time they were there.  These olive-sized treats are great by themselves or added to salad, desserts, and dressings. Here's the lovely dressing I make with them. Tangy, sweet, and sour....so delicious.


Kumquat Dressing
~1/2 cup (I used 7 pieces) kumquats
1/2 avocado or 3-4 tbsp oil
1 clove garlic
piece of shallot (about the size of a garlic clove)
4-5 tbs apple cider vinegar
1/4 cup water (to start, you might add more)
1/2 tsp sea salt
1/2 tsp ground cayenne / small chunk of jalapeno / other hot pepper


To prepare:
1.  Do not attempt to peel the kumquats, the entire fruit is used. They might have a lot of seeds (mine were full of them) but they will blend well. Just remove the tiny stems and leaves and leave the rest intact.
2. Blend all of the ingredients, taste test, adjust salt, water, etc. and pour over some mixed greens.


Storage
You can store this dressing for days in the fridge if you happen to have any leftovers. I generally finish them off. Fresh dressings are just so yummy. : ) If it separates, just give it a stir, if it thickens, just add water/vinegar/lemon juice to it. Either way, make sure you taste it before pouring it all over a large bowl of greens.


Now, onto the health benefits..
As you might have guessed, similar to all citrus fruits, these olive-sized treasures are loaded with vitamin C, and provide a moderate amount f vitamin A along with minerals, such as manganese, calcium, iron, magnesium, and copper. They're also a very good source of fiber but if I were to eat them for their nutritional value I would really concentrate on the (1) antioxidants they provide due to the high amounts of vitamin C in them and (2) the phytonutrients in the peel. Phytonutrients such as limonene are in citrus peel that most of us throw away on a regular basis. Ironically, they have exceptional cancer-fighting and antiviral qualities, so we're putting medicine in the trash. The good news is, kumquats are eaten with the peel, meaning you're really eating a whole food, with all of its nutrients working together to help your body prevent or fight disease! Aren't we so blessed?!?
Enjoy!

♥♥♥

Dita

Quick Home Remedies to Your Rescue

Sunday, February 3, 2013


The weather has taken a turn and the temperature's been dropping, on the Northern hemisphere, at least. The changing of seasons always challenges the body more and even if you're not affected by it we all see more people fight a cold, catch the flu, or just develop a small cough or sneeze. In fact, so many people are sick where I work that the medical team started giving out face masks (yes, I'm serious!!!) so that people who come in with a cough can contain their germs.

Chances are, you can find all the medicine you need right in your kitchen. What do you reach for when you're "under the weather" or "got the chills", or have a sore throat or, not to mention, the "flu hit you like a truck"? Running to the doctor and/or the pharmacy for drugs is the common thing to do but is that the solution??? That depends on what we try to accomplish. Your produce basket, pantry, cabinets, etc. are guaranteed to have one or many of these ancient remedies that will help you prevent getting sick. And if it is too late for avoiding getting a cold because you have a runny nose, achy body, and maybe even a sore throat already, then these will come to your rescue and help relieve your symptoms.*

Ready for the list of the "True & Tried"?...


Garlic
The healing properties of allicin and diallyl sulphides and the warm energy that is present in these little cloves are to be treasured. Eating lots of garlic helps prevent colds but if it already hit you and it's too late for prevention, try crushing and eating a whole clove or two mixed into something, adding it to salad dressing, for example. It's hard on an empty stomach but if you're ready for it you may "down" an entire crushed clove by itself. I've done it and it works wonders very fast. As an alternative, you can add some to your regular veggie juice ingredients. Garlic is a natural antibiotic and cheap medicine to keep around the house.

Garlic Expectorant - For a Stuffy Nose and Congested Chest
You'll need:
3-4 cloves of garlic
little bit of crushed chili pepper / pinch of cayenne
1/4 cup honey
optional: 1 tsp of lemon juice

Use a garlic press or crush and chop the garlic very finely, chop the pepper very finely, and mix all of the ingredients into a thick paste.
Take a spoonful at a time, as often as desired throughout the day. Hold it at the back of your tongue to coat your throat, for a few seconds if your comfortable enough.


Ginger 
This medicinal root is full of warming energy, can increase circulation, promote healthy sweating, helps detoxify the body and has anti-imflammatory properties. A true treasure to keep at home at all times.
Add a piece to your juice ingredients or if you're ready for it, juice ginger by itself and take a ginger shot whenever you start feeling the onset of a cold. You may also grade it and squeeze the juice out of your gratings using a cheesecloth. It's especially helpful to take a hot shower or bath, drink a cup of hot water with ginger juice in it, and wrap up in blankets in bed. If done quickly enough you can heal yourself overnight. The cold will run its course so fast.

Lemon
A citrus of wonderful aroma, this sour fruit has healing powers that will come to your rescue. Its high levels of vitamin C will help boost your immune system and its antiviral and antibacterial qualities will help you in the healing process.

Drink freshly squeezed lemon juice (note: if your throat is very torn up already, this will not be pleasant) or add some to tea or your salt water gargle.


Honey
Before I get to its benefits...
*NOTE: Before you purchase any kind of honey make sure of its source. You need to know the true story behind the product. Ask the farmer questions, ask the salesperson at the grocery store, etc. There's a huge difference between abusing bees and stealing all of the fruit of their hard work, transporting them to pollinate other crop over the winter vs. providing them with a home permanently, caring for them, and taking only a portion of their honey. Should you even consume honey? It's a tough call and only you can decide for yourself. You can use just a little bit if you choose to and always do your research of the source. That's my two cents...  
While not vegan, many raw food enthusiasts, including me, use honey occasionally as a sweetener, applied to the skin, etc.
Besides its inviting flavor and natural sweetness, this amazing food is rich in enzymes and has antibacterial and healing properties, which are difficult to compete with. It shouldn't be a surprise that it's made it to the "home remedies list"!

The "Warm-You-Up" Tea
~1 in (2-3 cm) piece of ginger
juice of 1 lemon
honey
1 large cup of hot water
optional: pinch of cayenne

Grate the ginger and squeeze out the juice. Mix all the ingredients for a warming cup of tea.

Activated Charcoal Powder
This is a substance that is so versatile that an entire book could be filled with its uses and what it can do for your health as well as the fun stuff you can do with it in DIY projects, cleaning, etc.
While some people use it as a daily detox, simply taken mixed in water or as "Black Lemonade" - pictured below - you can take it if you have an upset stomach, digestive issues, diarrhea or even sore throat. One way of using it to relieve a sore throat is by mixing some of the powder with honey and putting the mixture under the tongue to let it slowly release (and be swallowed). This helps remove all the "stuff", germs, etc. that are clinging to the throat and the digestive lining and causing the discomfort. Make sure to use only FOOD GRADE activated charcoal with NO ADDITIVES!
Schizandu Organics has the purest version at a very reasonable price and it also comes with an eBook  guide with recipes and explanations of many uses.

You can get it on there website:
https://schizandu.myshopify.com/products/specially-milled-food-grade-activated-charcoal-powder?variant=30030006980

And on Amazon:
https://www.amazon.com/Activated-Charcoal-Detoxification-Whitening-Digestive/dp/B01BOFPW34/ref=sr_1_13_a_it?ie=UTF8&qid=1481501382&sr=8-13&keywords=activated+charcoal

Make the Black Lemonade by mixing:
glass of pure water
juice of 1 lemon
1 tsp - 1TBSP activated charcoal powder
1 tsp - 1 TBSP maple syrup (or other favorite sweetener)

Drink it to relieve digestive discomfort, hangovers, for daily detox, or during a cleanse, etc.


Oregano oil
Due to its very intense aroma and strong flavor, a drop goes a long way! A natural antibiotic with antibacterial and antiviral qualities, it's the perfect ingredient to add to your salad dressing or even add a drop to your tea. As I mentioned, it's very strong, and might even be too hard on your stomach when consumed so experiment with it mixed with other food or putting some in a capsule, if you wish, and avoid taking it on an empty stomach!!!

MY favorite is Oreganol....the wild stuff, that's also non-GMO! It can be pricy but it's worth it and  you can get it here:
https://www.shop.northamericanherbandspice.com/product/oreganol-p73-1-fl-oz/

And on Amazon:
https://www.amazon.com/North-American-Herb-Spice-0-45-Ounce/dp/B00012NJ4G/ref=sr_1_7_s_it?s=hpc&ie=UTF8&qid=1481502302&sr=1-7&keywords=oregano%2Boil&th=1


Apple Cider Vinegar (ACV)
Gargle with diluted ACV or make a tea by mixing a cup of hot water with a spoonful of vinegar and a spoonful of honey to soothe a sore throat.

I use Bragg's...my favorite. They are RAW, unfiltered and with the mother!!....which is what you want to get so that you have as much of the probiotics as possible!

You can get it on their website here:
http://bragg.com/zencart/index.php?main_page=product_info&cPath=1&products_id=9&zenid=ck21g6b5rkkh72o3hm0a7dbp81

And on Amazon:
https://www.amazon.com/Bragg-Organic-Apple-Cider-Vinegar/dp/B001ID6MIC/ref=sr_1_fkmr1_3_a_it?ie=UTF8&qid=1481501852&sr=8-3-fkmr1&keywords=barges%2Bapple%2Bcider&th=1


Carrot-Apple "Throat-Soother"
1 medium carrot
1 medium apple
juice of 1 lemon
generous amount of honey

Grate the carrot and the apple and, in a bowl, mix them with the lemon juice and the honey. This is a very delicious recipe for a snack too and is full of throat-soothing qualities. I highly recommend giving it to kids who will take this much easier than anything else due to the sweet, "yummy" factor! My grandma and mom both made this for me when I was a little kid and I loved it. The good news is, you don't even have to wait to get sick, you can just try it for dessert one day when there's no chocolate cake around ; )


Cayenne Pepper
I love spicy foods. One of my favorites to heat up a meal is cayenne. I add some to my dressing, to soups, etc. Yes, it's hot and that heat provides a lot of warming energy by speeding up your circulation. It's also a decongestant, an expectorant, and a food very high in immune-system-boosting vitamin C.
The capsaicin in hot peppers also acts as a pain reliever and it helps increase  your metabolic rate (great for weight loss support). As cayenne is a also a vasodilator, it increases blood flow (lower blood pressure) and stimulates absorption (deliver nutrients to your cells).
You can always keep some of the ground version at home for times when the peppers are not in season.

Sea Salt
Much better for your health than ordinary table salt, sea salt is wonderful to gargle with for soothing a sore throat.
Gargle with warm water with a little bit of sea salt dissolved in it. You'll be immediately relieved of the pain at the back of your throat. Repeat as necessary.

Medicinal Mushrooms
Especially for prevention, mushrooms of all sorts made into tea, extracts, tinctures, etc. are great to take periodically for boosting your immune system. To be accurate, they're immune system modulators, and since they are tonic herbs you can take them on a regular basis. Try the Reishi tea described here, for example. As always, start with small amounts with new-to-you herbs and medicinal mushrooms.

...And don't stop at your pantry / fridge. Taking hot baths or showers or sitting in a sauna can make a whole world of difference. You'll warm up, the steam will help you decongest, and if you bundle up and wrap up in a blanket immediately you might just sweat out all of your discomfort in one session. Worth a try, doesn't it?

Stay healthy!


*Keep in mind that these remedies, while they're beneficial to your body and overall health, are just for helping with your symptoms. All disease, whether it's a mild cold or a degenerative disease you're suffering from, is a sign of obstruction in the body that needs to be addressed for true healing.

Sesame-Kale Wafers

Sunday, December 30, 2012


The taste (or, rather, the memories) of a batch of similar chips stayed with me for so long that I had to create my own. Boy, was that a good idea! As the last batch of chips/crackers this year, I couldn't possibly imagine a greater new favorite. I had to label them wafers because they came out so thin and delicate and they have a "melt-in-your-mouth" feeling to them. Tart and spicy, green and nourishing, these crackers are light and yet, incredibly satisfying and addictive. Yes, they're hard to quit....hmm, ok that's a downside, but that's about it.

Sesame Seed Nutrition
As the main ingredients, these little seeds deserve some attention. Being so rich in bone-strengthening minerals, especially magnesium, phosphorous and calcium, is not all they have to offer. They're high in good quality protein and antioxidants as well. So tasty and so nutritious....you can't go wrong with them. Enjoy!


Incredible Kale Chips
(Ingredients for two sheets of chips)
1 cup sesame seeds
juice of 5 limes
1-2 cayenne peppers (or substitute powder)
1 large kale leaf
1/2 onion
1/2 tsp salt (or to taste)
your choice of sweetener to taste
water as needed


Directions:
0. Soak the sesame seeds beforehand if you have the time. 4 hours will do.
1. Chop up the pepper(s), onion, and kale into somewhat smaller chunks and process all ingredients in a high-speed blender until creamy. Most likely, you will need to help the blender get started by adding a little bit of water and keep tamping the contents down.
2. Taste test and add salt or sweetener if needed.
3. Pour the mixture onto two teflex sheets and spread it out as thin as you can.
4. Score it for square shape or use a glass or a cookie-cutter to make round shapes or whatever else you might prefer.
5. Dehydrate your batch at 140˚F (~60˚C) for an hour then lower the temperature to 115˚F (~46˚C) and dehydrate for several hours longer, till you have crispy thin wafers.

You're in for a treat!

It's almost the end of this year. Is there anything you'd like to leave behind? Is there anything new you'd like to start with the beginning of the new year?


Biscotti In The Raw

Sunday, December 23, 2012


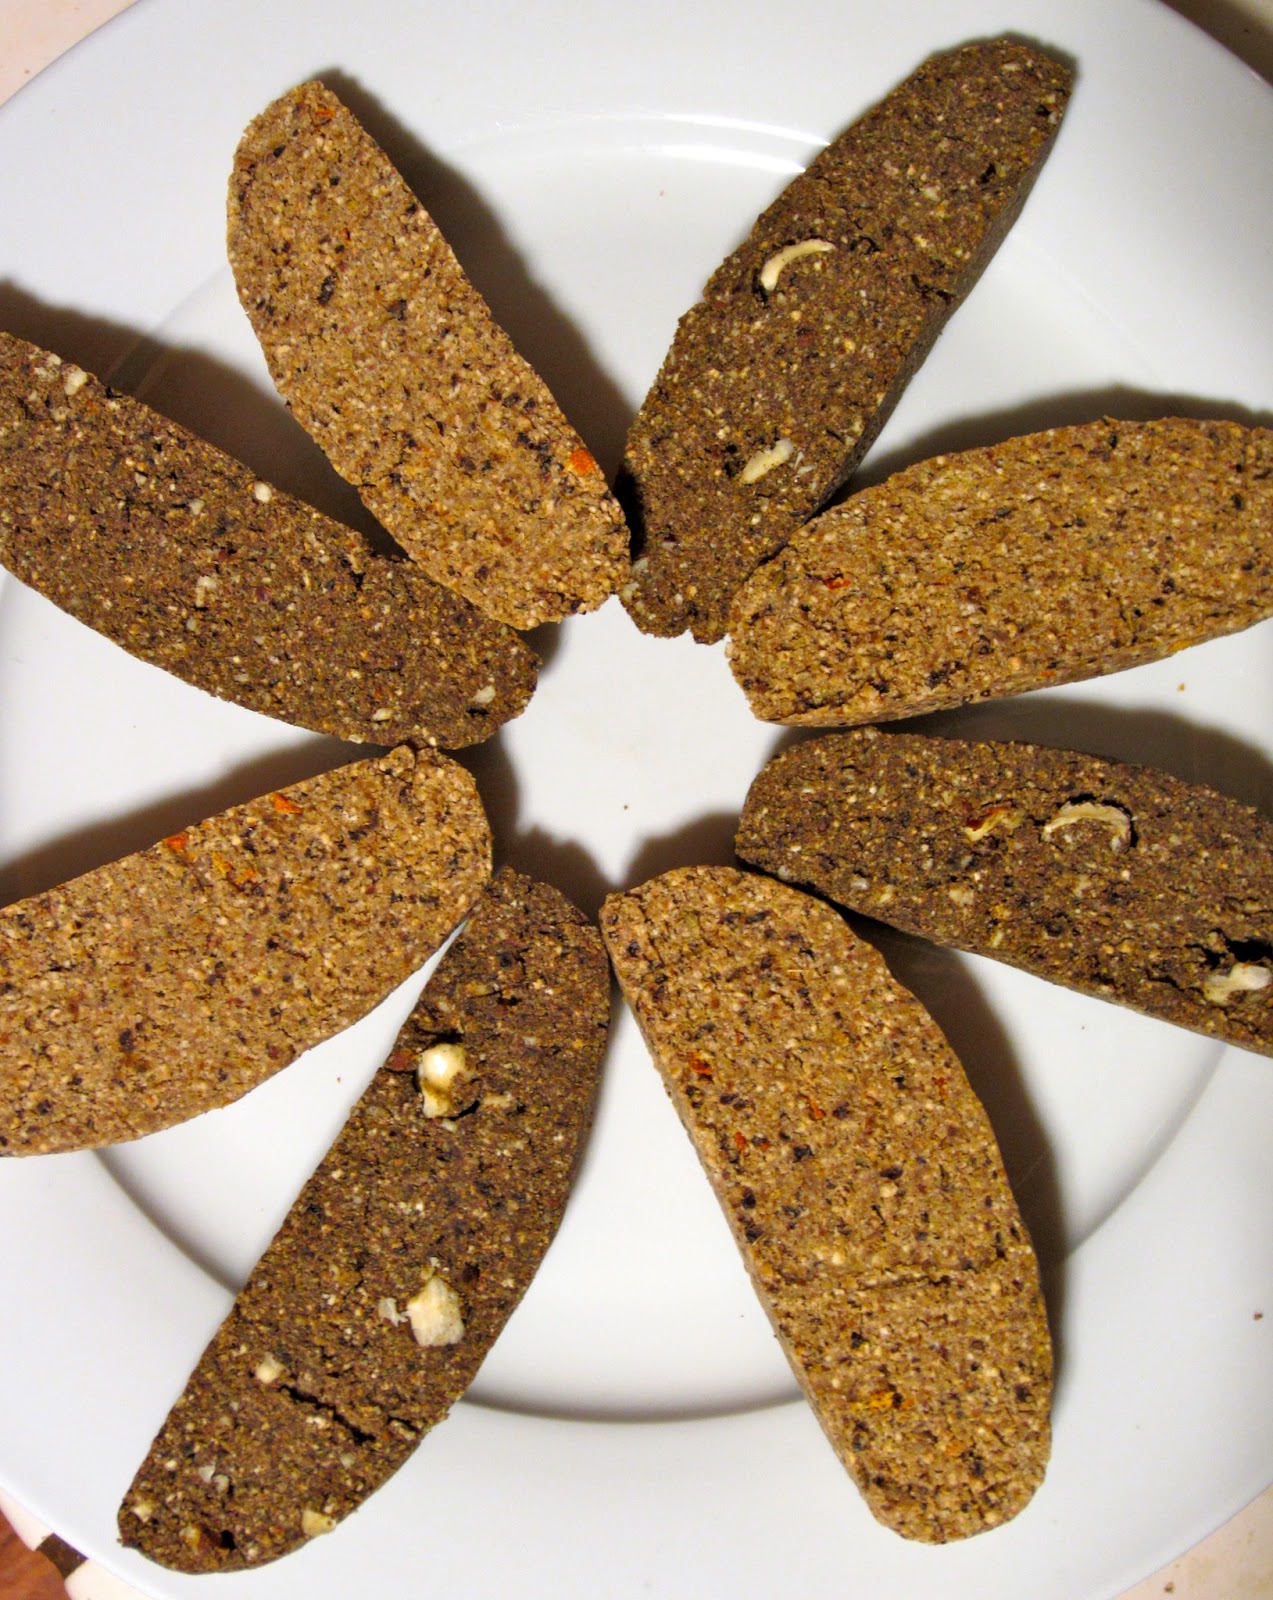
Having turned vegan at such a young age, there are many recipes I never made, cooked or baked the traditional way. While a vegan lifestyle is well-catered to by restaurants and health-food stores I have never seen and/or tried even vegan biscotti, not to mention raw and living vegan biscotti. For some reason though it popped into my head about two weeks ago when I started brainstorming and trying to figure out what to make during the holidays. And then...everything started late (yes, so late that I just started this morning, two days before Christmas, crazy!) because of long hours at work and our busy little life getting in the way of life. While I haven't seen the sun in our beautiful valley for days and the rain won't stop coming down I was courageous enough to attempt to take some photos of these fresh out of the "oven" and here are the results. A double batch of incredibly flavorful (much more so than I expected) biscotti and pictures that will not hurt the reader's eyes, I hope ('sigh'). It could be worse, right!??
I've made two flavors, the classic, Italian version, of course for one. And I planned on making something else for the other but changed my mind in favor of the Carob-Hazelnut variety. Go ahead and substitute cacao for the carob if you prefer a chocolatey version, I probably would too, normally, but I'm avoiding caffeine this week. Ok, too much unnecessary information...here are the recipes, preceded by a health-note:

Nutrition
Almonds, one of the well-known cancer-fighting miracles of nature, are the main ingredients I'm using. Remember to save your pulp every time you make nut mylk, that's where your cheap, eco-friendly, almond flour will come from. And what better way to use almond flour!?
Anise seeds, like most spices/tiny seeds, are very rich in minerals and most B-vitamins, and they're known to be a digestive aid.
And if you go with carob, as I've mentioned before, this caffein-free bean is very rich in calcium, practically fat-free, has no oxalic acid to interfere with absorption of nutrients, and is naturally sweet so you'll probably use less sweetener in your recipes when using carob.


Classic Biscotti The Raw Way
(Makes 8 slices)
6 cups almond flour
6 tbsp golden flax seeds
2 cups raisins (soak them in orange juice or water beforehand)
sweetener (honey/maple syrup/agave syrup) to taste
optional: ~1 tsp coconut oil
2 tsp anise seeds
zest of 1/2 to 1 orange
little salt
soaking liquid


Raw Carob-Hazelnut Biscotti
(Makes 8 slices)
6 cups almond flour
6 tbsp golden flax seeds
2 cups raisins (soak them in orange juice or water beforehand)
1/2 cup carob powder
sweetener (honey/maple syrup/agave syrup) to taste
optional: ~1 tsp coconut oil
few dashes of cinnamon
little salt
soaking liquid

1/2 cup hazelnuts 


Directions:
1. Soak the raisins beforehand for a little while, half an hour will do. I used orange juice but you can use water just as well. Whatever you're using, save the soaking liquid to add to your batter if needed.
2. Grind the flax seeds and put all ingredients (except for the chopped hazelnut, if you're making that version) in the food processor and run it to get an evenly crumbly mixture. Pinch test it, if it sticks together between your fingers you don't need to add more liquids, otherwise add some but just a spoonful at a time because it's very easy to overdo it with these kind of batters.
3. Pour your mixture into a bowl and by kneading it a couple of times form it into a loaf. If this is not happening because your batter is too crumbly, again, add a little liquid.
4. Place your "loaf" onto a teflex sheet and shape it into a flattened, firm, log. Slice it carefully, on the diagonal, making about half inch or a little thicker (~1.5 cm) slices. 
5. Stand them up on a sheet and dehydrate them for an hour at 140˚F (~60˚C) and then lay them flat on a screen and dehydrate them for a few more hours at 115˚F (~46˚C). 

If you have kids, they'll keep asking you "When are they gonna be done?" so make sure to keep them busy with something else. When they are done, have some fresh, while still warm, with a cup of mylk and/or a fruit spread if desired. Once they're cooled off, consider wrapping some for a Christmas present for someone. There's nothing like a home-made present you put your love into! You might want to save a couple so your kids can put them out there on Christmas Eve for Santa too. You never know...one day he might be inspired to go raw and refuse all the cookies at other households ; )

Happy "Baking"!


Carob Buckwheat gRAWnola

Saturday, December 8, 2012


Cooler weather calls for warming foods. Does that mean you have to give up on your raw lifestyle? Absolutely not. There are plenty of foods out there with great warming energy. Buckwheat is one of  them. So why not use some buckwheat in recipes this season? Aside from its warming energy buckwheat has many health benefits. It's very high in minerals in general, especially such as manganese, magnesium, copper and phosphorous and some of those minerals are hard to get enough of. At least it seems that a large percentage of the population is deficient in magnesium, for example.
These seeds (buckwheat is actually a seed, not a grain) happen to have a very high fiber content, and are a complete protein too, not to mention their high niacin (vitamin B3) content, which is a natural antidepressant. Another food that's good for your bones, your skin, might help reverse gray hair, benefits your digestive tract and might even elevate your mood besides being an exceptional source of healthy protein (can you believe you'll get more protein from a 100g of raw buckwheat than cooked beef, for example?!!) A pretty good choice for breakfast or a snack and combined with the rest of the ingredients below you can make delicious winter granola with it. If you're feeding more than 1-2 people you might want to make a double batch so you don't need to do it twice a week : )

Raw Carob Buckwheat gRAWnola
2 cups buckwheat
1/2 cup sunflower seeds
1 tbsp golden flax seeds
1 tbsp sesame seeds
1/2 cup (or more) raisins
1/2 cup (or more, to taste) carob powder
handful of coconut shavings / 3 tbsp shredded coconut
3-4 tbsp melted coconut oil / other oil of your preference
cinnamon
salt
Add your favorite sweetener, nuts, different dried fruits, additional spices, etc.

Directions:
1. Soak the buckwheat for 8 hours or overnight rinsing it a couple of times thoroughly. If you have time  you can sprout them too before using them in this recipe.
2. Grind the sunflower, flax, and sesame seeds briefly, just enough that they're coarsely "chopped".
3. Chop the raisins and other dried fruits you're using into smaller pieces.
4. Mix all the ingredients really well so that the salt and all the flavors are evenly distributed.
5. Taste test your batch and add more sweetener, etc. if necessary
6. Spread on two trays and dehydrate them for a couple of hours at 140˚F then lower the temperature to 115˚F and dehydrate for several hours longer.

Your house will smell unbelievably heavenly, I promise!
Serve while still warm with your favorite nut mylk or dry, as is. I never liked my food soaked so I always eat muesli, granola, and cereals dry and crunchy.
Pack some into your lunch box, or take on travel. This is a great warming and high energy food.
Happy gRAWnola making!

P.S: Have you noticed the ladybug?? : )